
Jira Overview
Jira is a robust project management tool utilized by software teams for planning, tracking, and releasing software. It facilitates issue and project tracking to enhance coding efficiency, streamline workflows, and expedite superior software delivery.
Using Jira at Planet Argon
Section titled “Using Jira at Planet Argon”At Planet Argon, we have customized Jira to cater to the distinct needs of our agency, which serves multiple clients, each with varied requirements and workflows. Below is how we’ve tailored Jira for our specific use.
Issue Estimation
In Jira, we leverage estimation features to assess work scope, considering task complexity, uncertainty, and prior related experiences. We’ve adopted a 21-point system for estimating the effort needed to see a user story from inception to deployment. Here’s our approach to estimation:
- Estimates gauge the size of the task, not the time to completion.
- They serve as guides and are not binding promises.
- Our team is encouraged to rely on their instincts without overanalyzing.
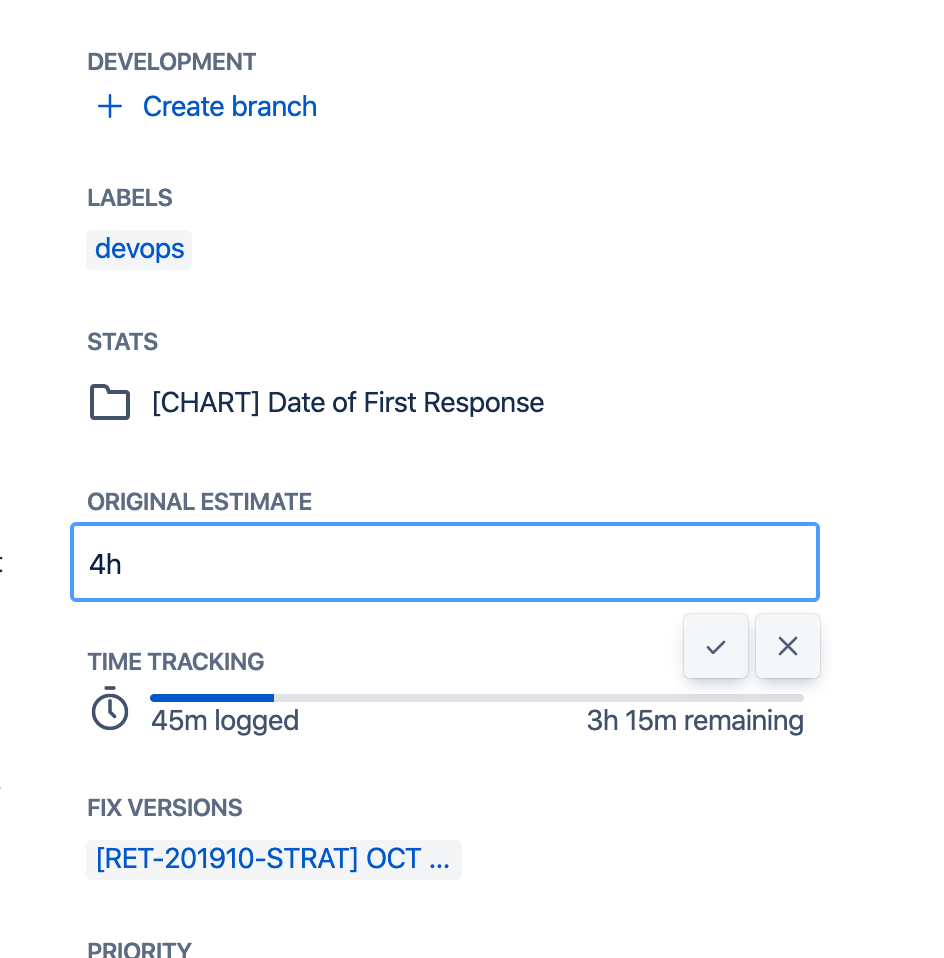
When making an estimate, consider:
- The extent of required research.
- The testing needed to verify task completion.
- The potential need for staging environment deployment for client UAT.
- The necessity of production deployment.
Estimation Table:
| Story Points | Hour Ranges | Jira Ticket Types | Jira Estimate Entry |
|---|---|---|---|
| 1 | 1 hour | Bug, Production Improvement, Task | 1 hour |
| 2 | 2 - 4 hours | Bug, Production Improvement, Task | 4 hours |
| 3 | 4 - 10 hours | Bug, Production Improvement, Task | 8 hours |
| 5 | 10 - 20 hours | Bug, Production Improvement, Task | 16 hours |
| 8 | 20 - 40 hours | Epic, Parent Ticket | 32 hours |
| 13 | 40 - 80 hours | Epic, Parent Ticket | 60 hours |
Managing Exceeding Estimates
Section titled “Managing Exceeding Estimates”Should a developer foresee surpassing the estimated effort, proactive management is essential. The steps include:
- Privately update the Jira ticket with your progress and a new Level of Effort (LOE).
- Tag the Project Manager and Technical Lead for visibility.
- The Project Manager informs the client about the status and implications.
- The client or Product Owner decides whether to approve the new LOE or pause the project, which may lead to backlogging the ticket.
- Upon approval, document the new LOE in Jira before proceeding.
Best Practices for Issue Estimation
Section titled “Best Practices for Issue Estimation”- Regularly compare current estimates against past tickets to refine accuracy.
- Contemplate the full development cycle when estimating.
- If in doubt about an estimate, discuss openly with the team.
These best practices help us maintain client transparency and promote efficient, valuable service delivery.
For additional information on ticket estimation, consult the FAQ section or contact the Project Management team.
Public vs Private Comments
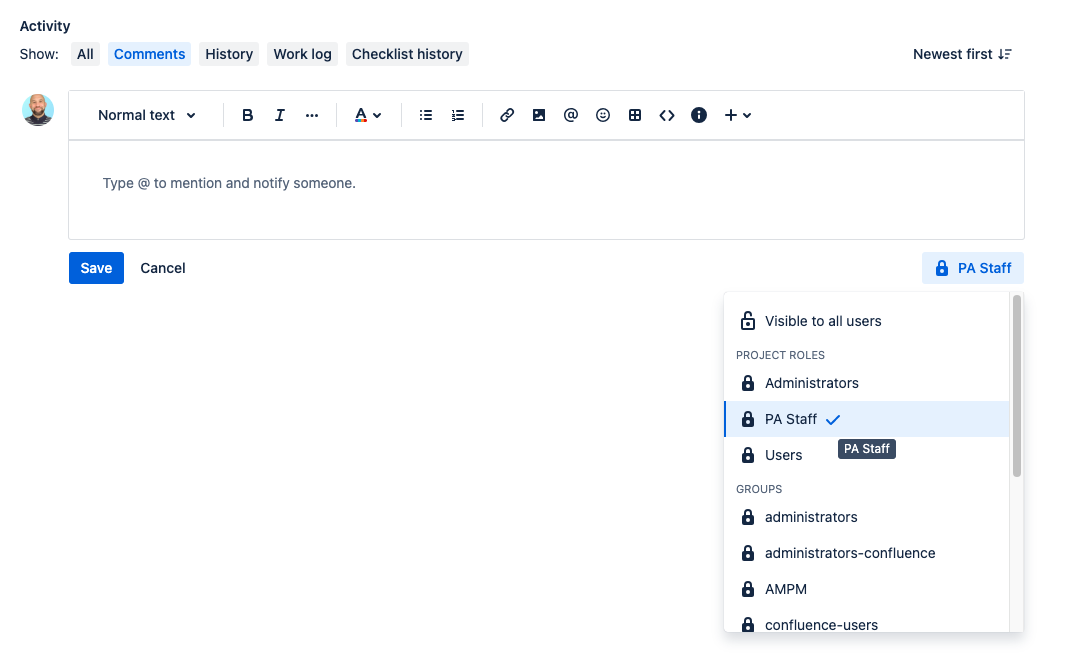
We utilize Jira’s feature of private comments to control the visibility of internal discussions. When commenting, you can restrict visibility to the “PA Staff” role, ensuring only Planet Argon staff and certain contractors view these comments. This process allows us to deliberate on issues internally without overloading clients with notifications.
Notifications and Slack Integrations
With the potential for notification overload, Planet Argon has implemented a set of best practices for email filtering and Jira notification management. All engineers are required to follow these practices to prevent missing crucial notifications.
Please complete these steps within one week of setting up your email and Jira accounts.
I. Set Up Email Filtering
Section titled “I. Set Up Email Filtering”Planet Argon mandates two essential email filters for all staff: Jira and Confluence. These filters help manage notifications for mentions in tickets or task assignments. Here’s how to set them up:
-
Log into your PA Gmail account.
-
In the left menu, click “More,” then select “Create new label” at the bottom.
-
Type “Jira” into the “Please enter a new label name” field and create it.
-
Repeat steps 2 and 3 for a new label named “Confluence.”
-
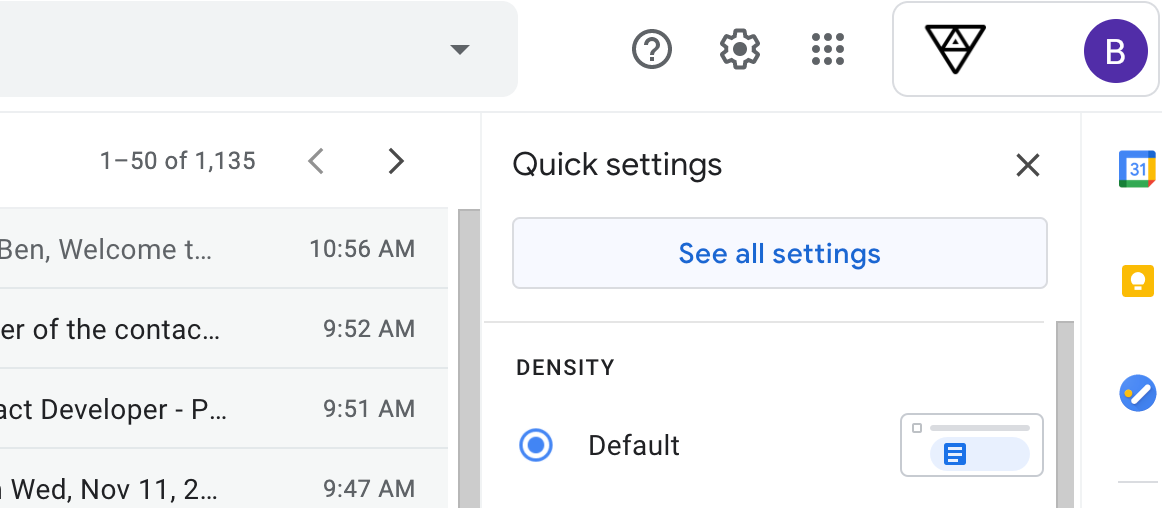
Go to the Settings section of your Gmail.
-
Select “Filters and Blocked Addresses” and click “Create a new filter.”
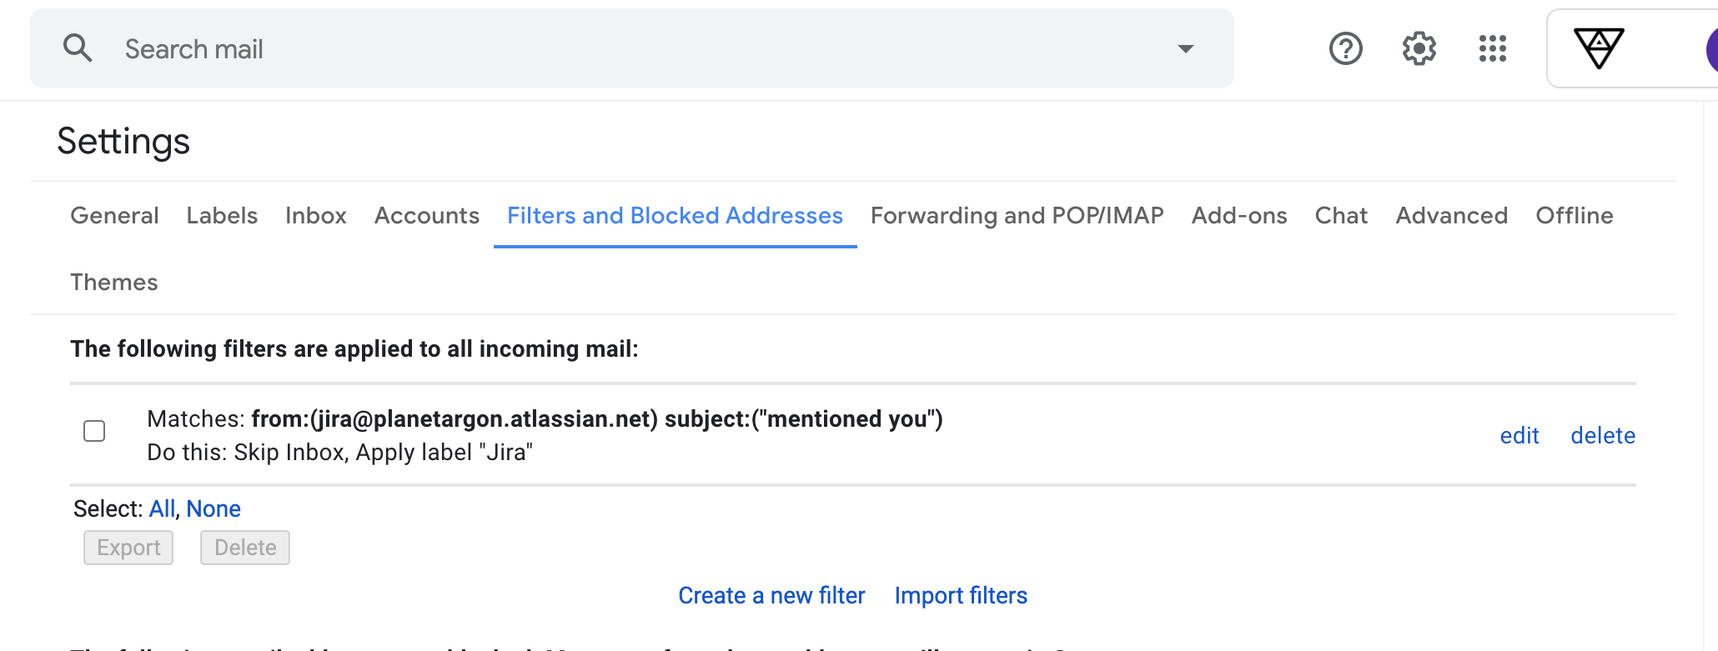
For Jira Notifications:
- In the From field, enter jira@planetargon.atlassian.net.
- In the Subject field, input “mentioned you.”
- Click “Create filter,” select both “Skip the Inbox” and “Also apply filter to” matching conversations, then choose the “Jira” label.
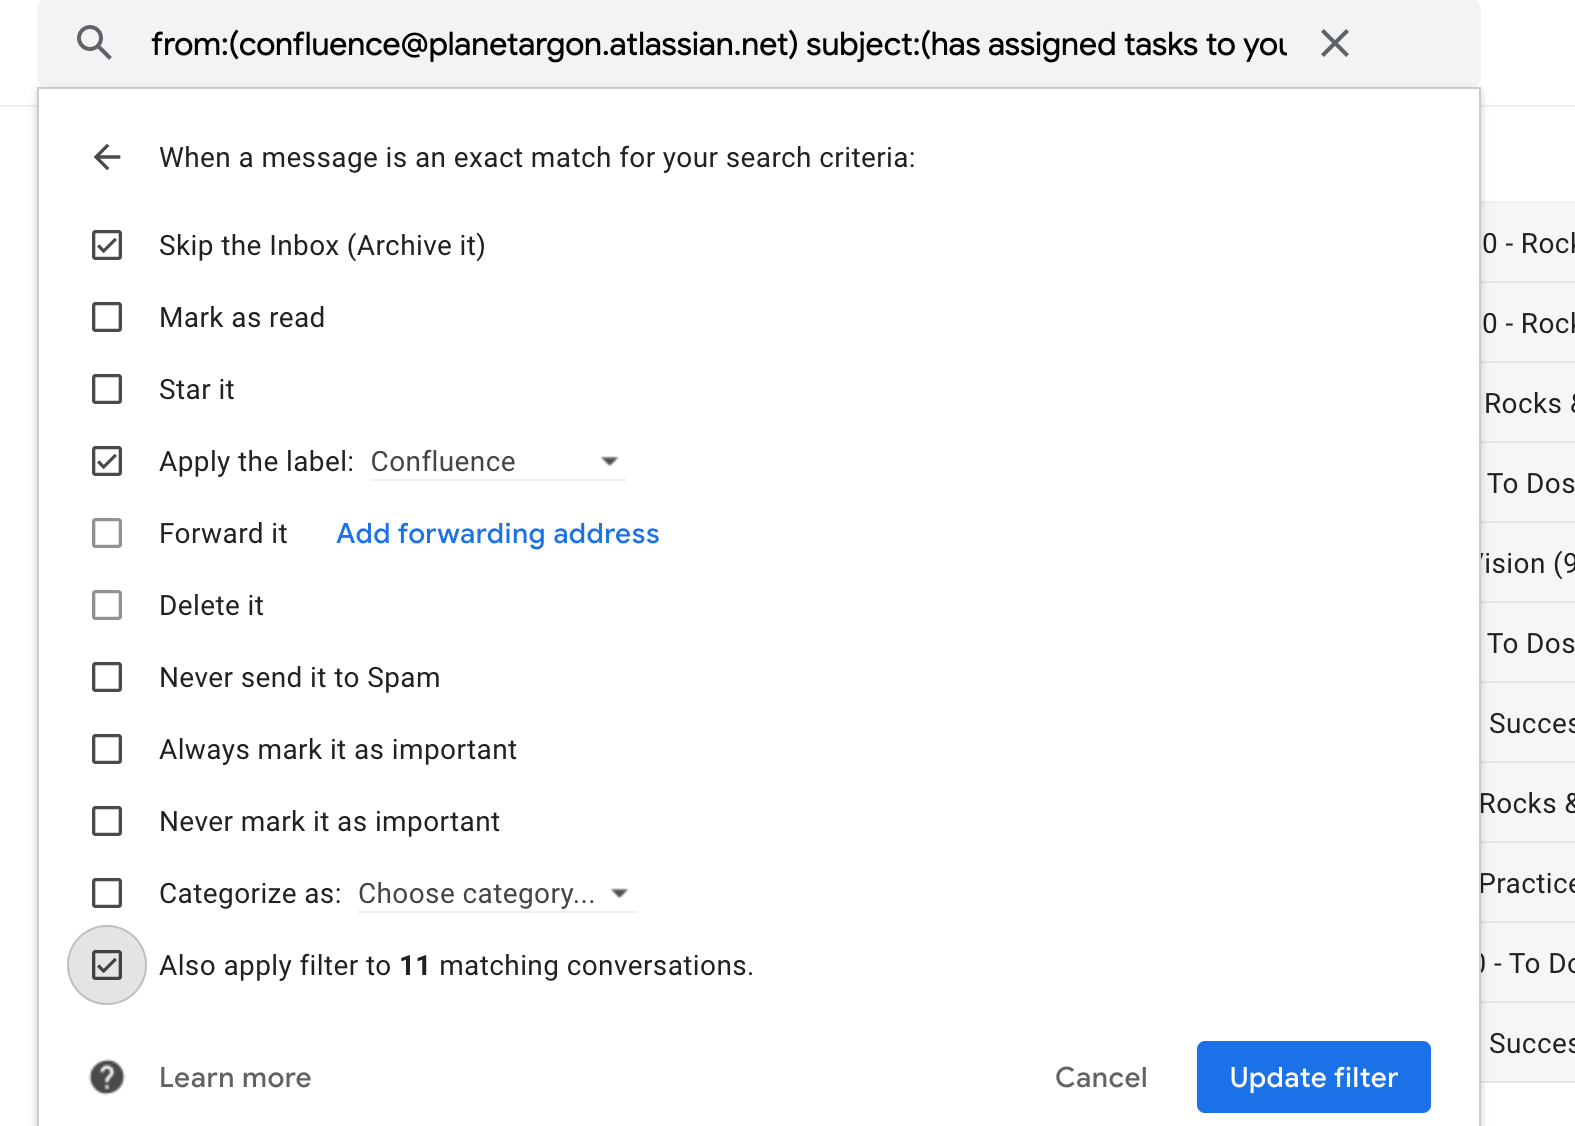
Repeat the process for Confluence notifications using confluence@planetargon.atlassian.net and adjust the Subject field accordingly.
Note: Changes made in the browser will reflect across all your devices, so no need to repeat these steps for desktop mail apps.
II. Set Jira Notification Settings
Section titled “II. Set Jira Notification Settings”-
Access your Personal Settings in JIRA.
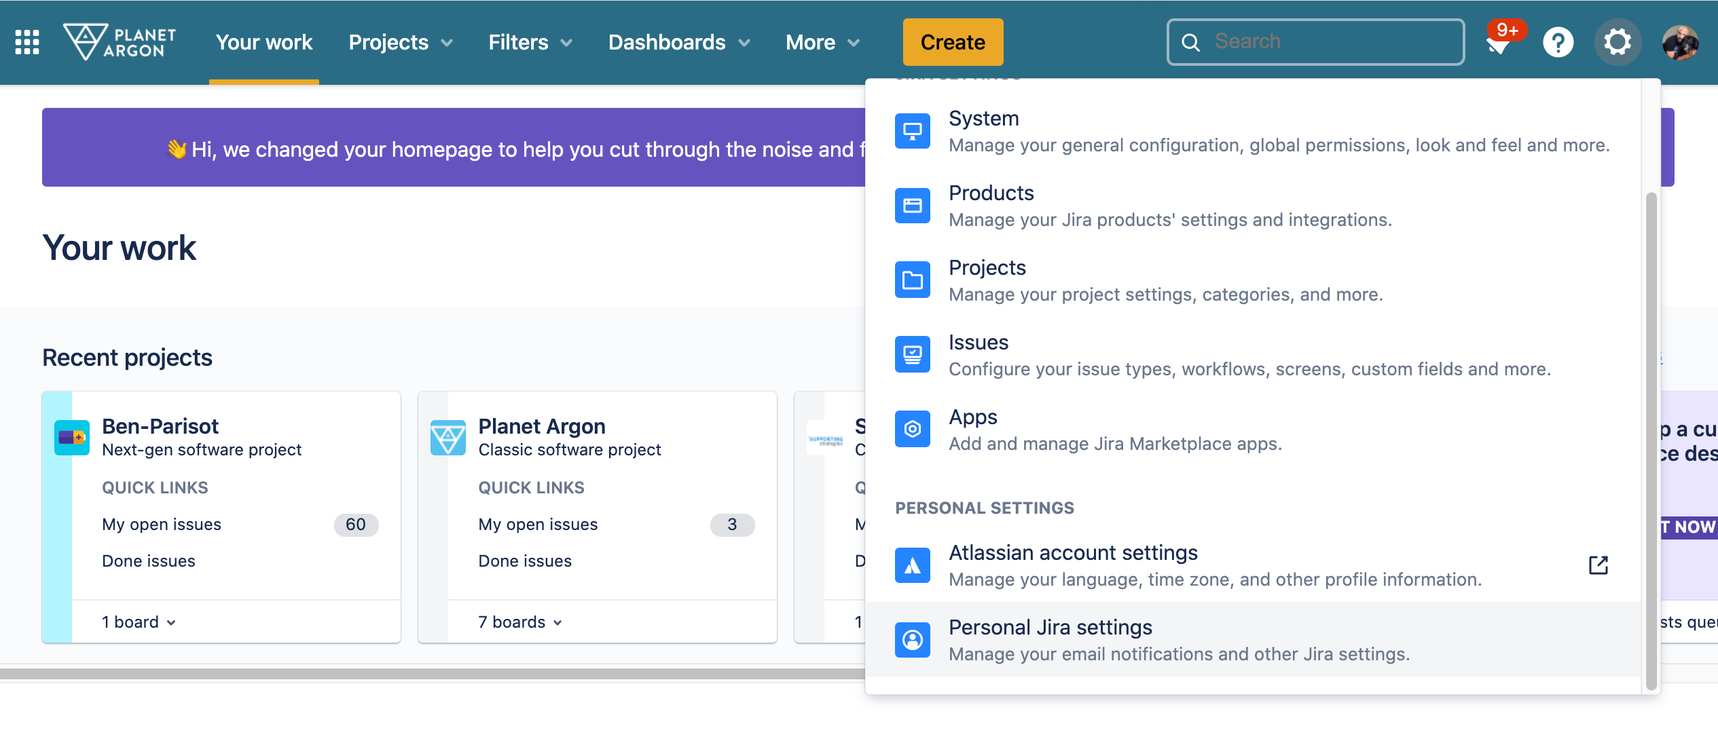
-
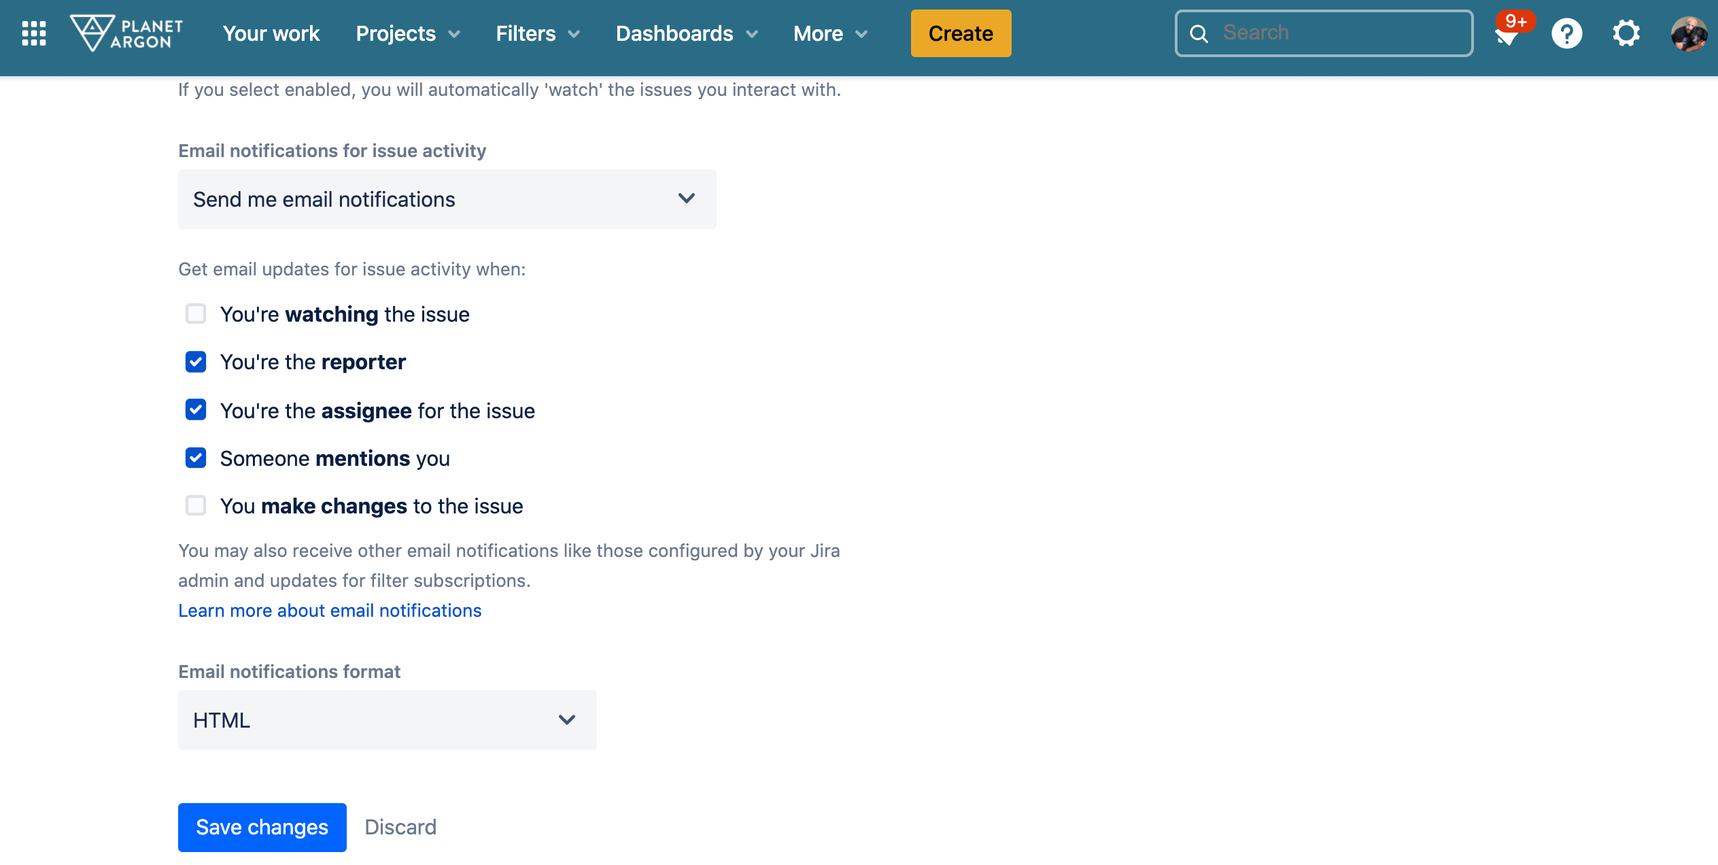
Ensure you have email notifications turned on for when:
- You’re the reporter (typically for project managers or tech leads).
- You’re the assignee for the issue.
- Someone mentions you.
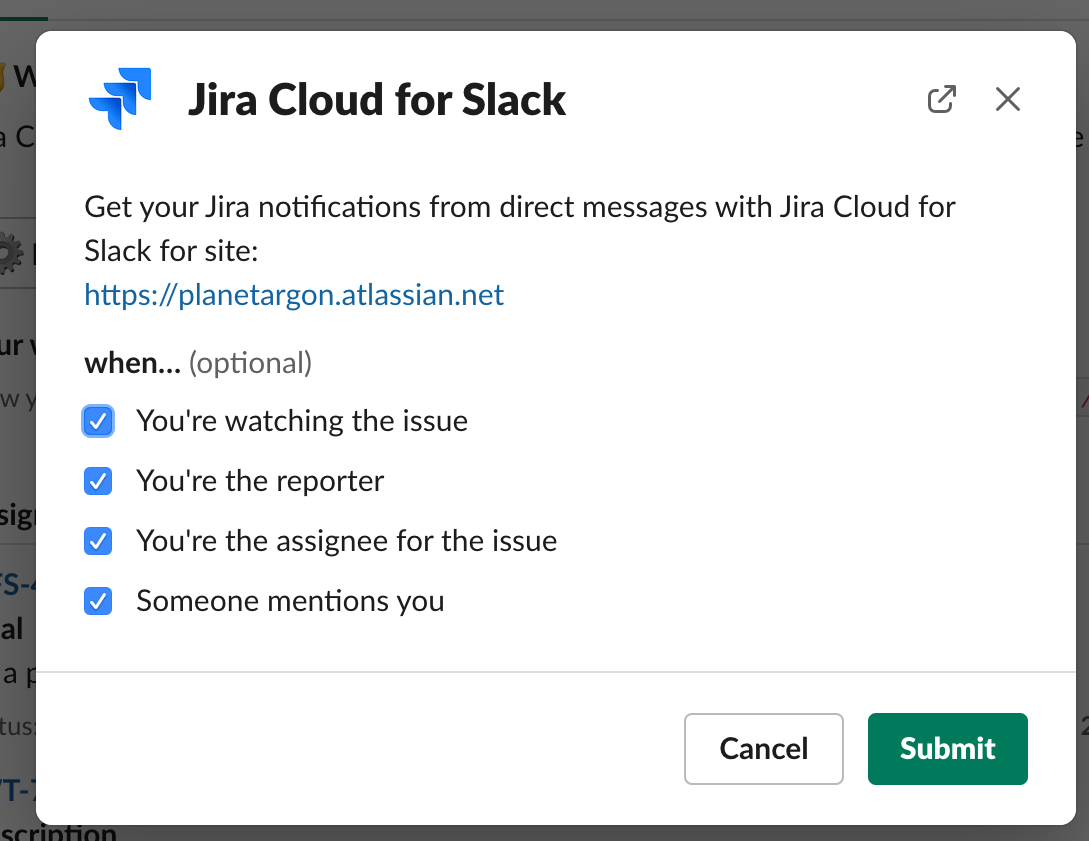
III. Install Jira Cloud Plugin to Slack
Section titled “III. Install Jira Cloud Plugin to Slack”- Navigate to the plugin’s landing page and click on the “Open in Slack” button.
- Authorize the plugin by selecting “Allow.”
- Log in to your Jira account to integrate the plugin.
- Mandatory notifications for PA engineers include “You’re the assignee for the issue” and “Someone mentions you.”
GitHub Integrations
Jira is directly linked to our GitHub repositories, facilitating a smooth transition from Jira tickets to coding in GitHub, with traceability from branch or PR to the Jira issue.
Time-Tracking with Harvest and Chronos
We use time-tracking tools like Harvest and Chronos within Jira for accurate billing and estimation refinement. Visit the Chronos pages within this handbook to learn more about how and why we use these tools.
Issue Statuses and Workflow
Our development process encompasses multiple steps, with each status in Jira reflecting a particular stage. Below is an outline of the statuses and approval process, but a more detailed explanation or diagram may be helpful here for visual reference:
Quick Reference:
Section titled “Quick Reference:”- In Discovery → Dev Ready → In Progress → Pull Request → Internal QA on Staging → Client UAT on Staging → Approved → Pending Deployment → Client UAT on Production → Done
“Changes Needed” can occur during reviews on Staging or Production.
The Full Process:
Section titled “The Full Process:”- In Discovery or Backlog - Gathering Estimates and Requirements
- When a ticket is submitted, or a bug is discovered by Planet Argon internally.
- An estimation of the level of effort (in Story Points) is made to resolve the issue or complete the task.
- This estimate is sent to the client to approve work to start (for things over 2 story points - over 8 hours).
- Dev Ready - Approved to Start
- Once approved to start, the ticket will be moved to Dev Ready in Jira.
- Development will start, and the ticket will move to In Progress.
- In Progress - Development Work is Happening
- The development process will start.
- Questions may come up during development and will be submitted in the Jira comments.
- Pull Request - Development Work is Being Internally Reviewed and Tested
- A pull request is submitted in the codebase for internal review on the Planet Argon side.
- Internal QA on Staging
- The ticket will be sent to staging to run through deployment automated testing.
- Then internally reviewed on Staging.
- Client User Acceptance Testing (UAT) on Staging
- The task will be sent to the client for review on Staging (if possible).
- The Jira ticket will be assigned to the client for review.
- Changes Needed
- If changes are needed, the ticket is reassigned to Planet Argon and will move to Changes Needed in Jira.
- If the change is small, it will be made promptly.
- If the change is significant, we will need to re-estimate the level of effort remaining and consult the budget.
- Then the ticket will go back to Client UAT on Staging, once the change has been deployed to Staging.
- Approved
- If changes are correct on Staging, and the change is ready to be pushed to Production, the ticket is moved into Approved by the client.
- Pending Deployment - to Production
- The ticket will go back to Planet Argon and we will arrange the best time to make the deployment to Production for the changes.
- Client UAT on Production - Changes Have Been Made and are on the Live Site
- The ticket will be re-assigned to the client in order for a review to happen on Production.
- If no changes are needed, the ticket is moved to Done.
- If changes are needed, the ticket is moved to Changes Needed and we will discuss whether a rollback is required or if the changes can stay on Production while being developed.
- Done
- Everything looks good and is verified on Production.
- Both parties are satisfied.
Third-Party Tools and Integrations
We assess and incorporate third-party applications into our Jira workflows as deemed appropriate and necessary. Currently, some of the tools we utilize include Harvest Time Tracking, JIRA Toolkit, Stepsize, GitHub, Issue Templates, and Issue Checklist. Please consult with your project manager regarding any specific app integrations that may apply to your work.
Creating a Jira Issue
The following process is designed to help the Development Team create actionable issues. An actionable issue must include:
- User Story: Defines a clear goal from the user’s perspective.
- Level of Effort (LOE): Assessed by the Development Team and assigned a T-Shirt Size.
- Issue Type: Categorized correctly according to the effort level.
- Requirements: A list of criteria that must be met to satisfy the user story.
- Subtasks: Created to organize the work effort effectively.
- Specifications: The technical description of the desired look and behavior.
- Estimation: An approximate number of hours required to complete the task.
- Acceptance Criteria: A set of testable conditions that must be met during QA and UAT.
Issue Types
- Epic: A collection of related stories and bugs aimed at achieving a significant business objective.
- Story: Describes a user-centric feature that may include sub-tasks.
- Task: Denotes engineering work not directly related to a user story, potentially including sub-tasks.
- Bug: Identifies functionality that isn’t performing as expected, with notes on expected behavior.
- Sub-task: Written by developers to organize and specify their work; can only be released as part of a story or bug.
Issue Requirements
These are detailed by either the Client Product Team or Development Team, answering the question, “What exactly needs to be built?” This high-level summary should be placed below the user story in the issue description.
Example Requirements:
-
User Story:
- As a: Student
- I want to: Bookmark or favorite helpful material
- So I can: Quickly access a personalized library of key references
-
Requirements:
- A bookmarking feature that allows students to save, view, and manage bookmarks.
- Bookmarking specifically designed for Earnable.
- An updated test suite encompassing the bookmark functionality.
-
Outcome:
PRs should only be issued once all requirements are met. The developer is responsible for marking these off as they are completed. Unmet requirements mean the issue should not advance to a Review or Done status. Should a requirement prove unfeasible, a new issue must be created for it, and the original issue should be updated with a comment citing the new issue number and the rationale for separation.
Acceptance Criteria
This section includes all conditions that must be satisfied before QA or UAT approval. These criteria are objective tests to confirm the feature is built correctly, ensuring clarity and preventing misunderstandings. They should align with and support the user story, providing clear scope.
The Development Team or the Client Product Team may draft acceptance criteria, which should be included in the issue description of any issue requiring QA or UAT.
Example Acceptance Criteria:
-
User Story:
- As a: Student User
- I want to: Log in to the application
- So I can: Access my courses
-
Acceptance Criteria:
-
For Valid Login:
- Given I am a logged-out student user,
- And I am on the login page,
- When I enter valid credentials,
- And I click ‘Sign In’,
- Then I am logged into the system.
-
For Invalid Login:
- Given I am a logged-out student user,
- And I am on the login page,
- When I enter invalid credentials,
- And I click ‘Sign In’,
- Then the system alerts me of incorrect email or password use.
-
Breaking Down Tickets
Creating a Sub-Task:
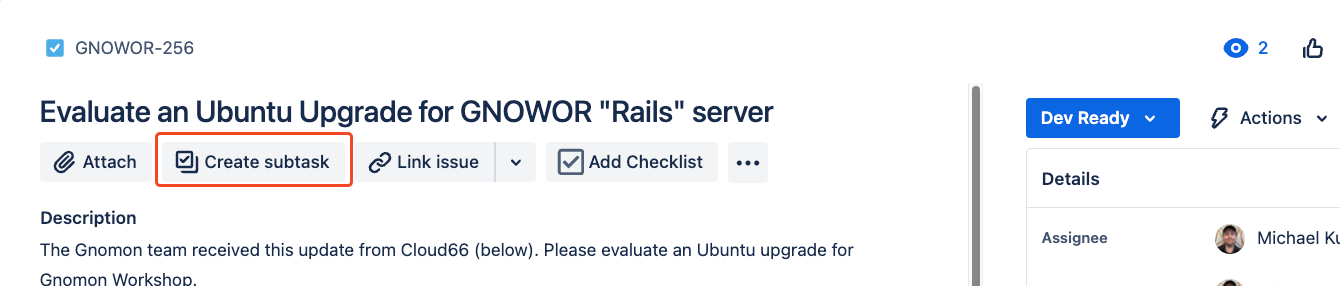
- To create a sub-task, use the options menu on the parent ticket. Note: Sub-tasks cannot be nested within other sub-tasks.
 -
-
When to Use Sub-Tasks:
- Estimate ≥ 10 hours: Definitely break down into sub-tasks.
- Estimate ≥ 4 hours: Likely a good candidate for sub-tasks, unless it is a monolithic task that’s hard to segment.
- Estimate < 4 hours: Consider sub-tasks if the work will be divided among different developers.
- Counterindications: Avoid using sub-tasks unless the task can be clearly divided into at least two distinct parts.
Estimating Sub-Tasks:
- If a parent ticket has sub-tasks, assign an estimate to each sub-task individually.
- The parent ticket might not have its own estimate or could include an estimate for development overhead (like technical strategy or QA).
Using Checklists
On a single ticket, use checklists to itemize requirements. (If a parent ticket has sub-tasks, make sure to place the checklist on the relevant sub-task rather than on the parent).
You can optionally estimate individual tasks to help generate your total estimate for the task/sub-task.
Checklists are a great way to itemize detailed requirements; for example, for a new form you might list all the fields, validation rules, and flash messages, and specs to write, then check off each item as you complete it.
Indicate items that have blockers (see formatting below), especially if the client is the blocker.
Also indicate if an item is rendered irrelevant (either the client has changed their mind, or a new development route means that task is no longer needed).
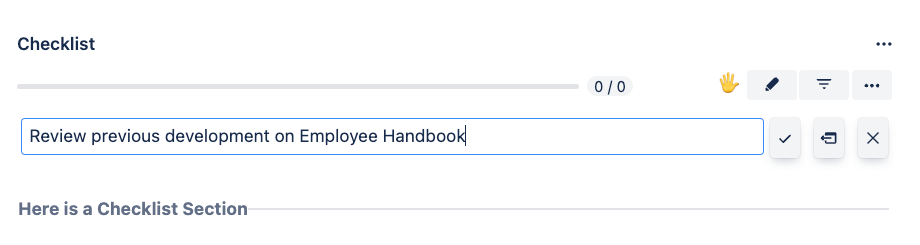
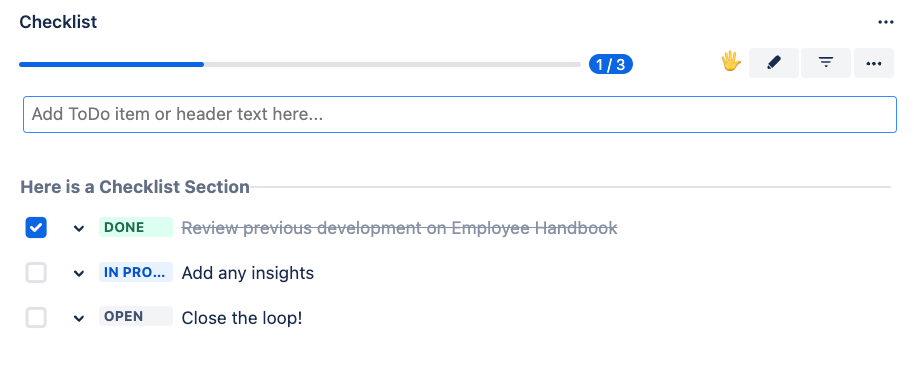
Here’s an example of a partially completed checklist (first as you would enter it in the Description, followed by how it would display):
Communicating with Clients
Completion and Review Process:
-
Once a ticket is completed, submit it back to the client and/or a team member for review.
-
For peer review (pull request), assign it to a peer with the following details (use the template provided):
- Completed Features: [List them here]
- Review Link: [Insert link]
- Reference Screenshot: [Insert image or link]
- Next Step: [@Teammate] to review and either provide feedback or approve the merge to master.
-
For client review, assign it to the client with the following details (use the template provided):
- Completed Features: [List them here]
- Review Link: [Insert link]
- Reference Screenshot: [Insert image or link]
- Next Step: [@Client] to review and either provide feedback or approve the push to production. Reminder that a successful push to production will close the ticket. Any new bugs or requests should be filed as new tickets.
Getting Quicker Client Approval:
- Deploy to a staging URL and direct the client specifically to the area for review. Be explicit about which staging server is being used.
- For styling bugs or similar issues, fix and deploy to staging, then provide a screenshot showing the fix on staging to the client for a quick approval.
- For larger features, periodically share progress with screenshots or screencasts in comments, avoiding a “big reveal” at the staging approval phase.
- For tickets with multiple user steps, consider a short screencast demonstrating the process in development or staging to save the client time and to clarify the outcome.
Taking ownership of a Jira ticket
Whenever a ticket gets assigned to you, we expect you to take ownership of it. This entails:
Review the ticket and ask yourself:
- Do I understand why this ticket is important to the Reporter?
- Do I have a clear understanding of what the success criteria is?
- Am I the appropriate person to tackle this ticket?
- Can I resolve this ticket by the Due Date?
- Can I complete this within the estimated time?
If you answered Yes to each of these
- Reply to the ticket and let the Reporter know that you have everything you need to proceed.
- If the Reporter’s ticket description is vague or confusing, please request clarification before beginning work. This can include asking the Reporter to confirm that your understanding matches their expectations.
If you answered No to any of the first questions
- Ask clarifying questions to the appropriate people.
- Estimate the task at hand
- If you’re not the appropriate person, please get the attention of a Project Manager so that they can find an appropriate person.
Managing expectations within a Jira ticket
Assuming responsibility for a ticket in Jira means managing the expectations of the Client Report and Project Manager. This entails:
-
Keeping the Reporter, Client, and Project Manager informed about progress on tickets marked ‘In Progress.’
Aim for transparency by limiting the use of the “PA Staff Only” restriction to foster client insight into the progress and address potential concerns about delays or changes promptly. If in doubt, consult with the PM overseeing that client.
-
For small tickets (under 2 hours), extensive updates to the client may not be necessary.
-
For larger tickets that span over multiple days, provide updates in the ticket detailing:
- Current progress
- Completed tasks
- Remaining tasks
- Potential roadblocks (and raise any that are anticipated)
- Estimated time to completion
- Time logged in Harvest
Internal conversations that do not pertain to the client may be marked as “PA Staff” (see Public vs Private Comments, above).
Changing the ticket type
If a ticket is incorrectly categorized:
-
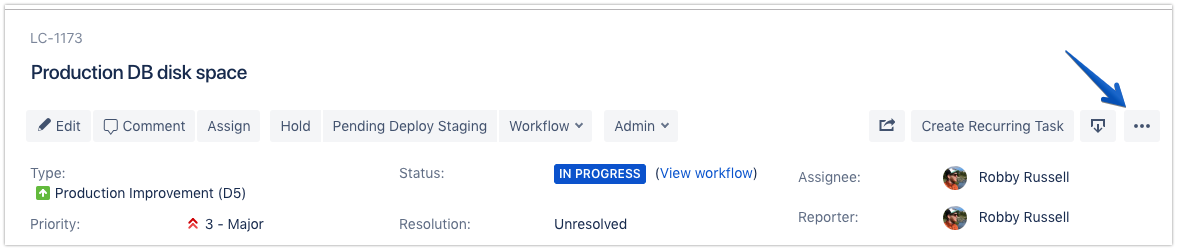
Click the ”…” button on the ticket to view additional options.
-
Select “Move”
-
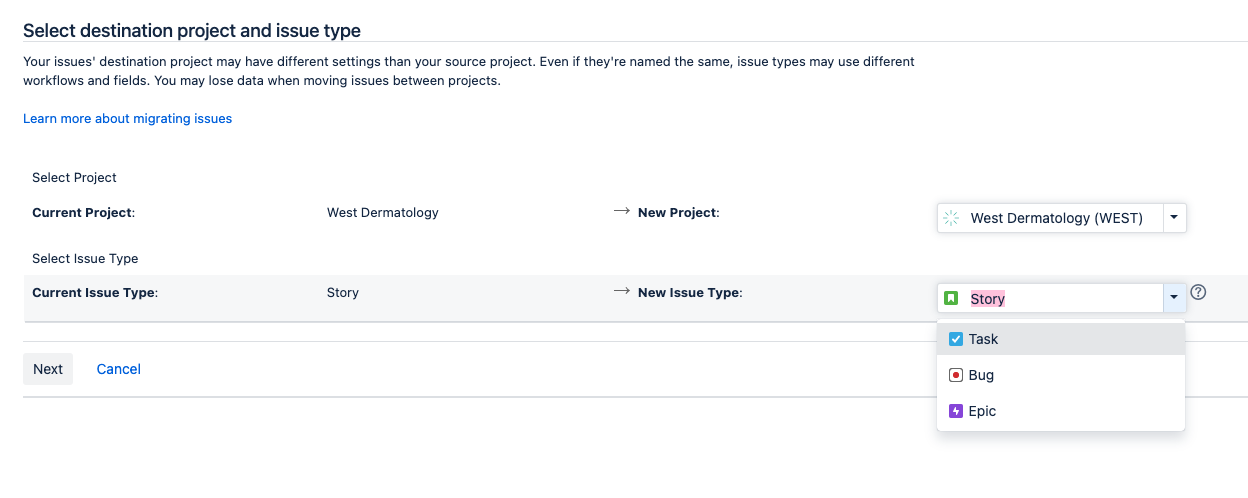
Choose the appropriate ticket type and proceed with the subsequent steps.