

Git Standards
Using main instead of master
Section titled “Using main instead of master”We advocate for inclusive language in coding. Therefore, we use main as the default branch instead of master. For any new repositories, ensure the default branch is named main:
- Confirm you have the latest copy of the code in the primary branch, create the new branch, and push it to GitHub
  git fetch origin --prune
  git pull origin master
  git checkout -b main
git push --set-upstream origin "main"-
Update any CI configs that run on a specific branch
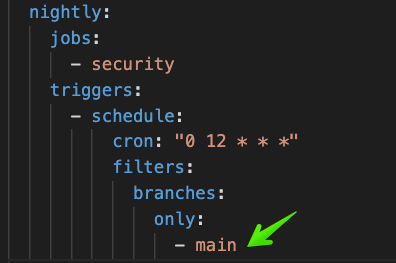
-
Delete the
masterbranch locally and in GitHub
git branch -D mastergit push origin --delete masterUse Atomic Commits
Section titled “Use Atomic Commits”Atomic commits provide
Commit Messages
Section titled “Commit Messages”When committing your changes, ensure to leave a comprehensive trail that succinctly communicates the changes you have made. This is a courtesy to your teammates and your future self, fostering smoother debugging and understanding of the project’s evolution.
NOTE: Use atomic commits!
Atomic commits are the smallest sized commit you can make that captures the completion of one specific thing. As Samuel-Zacharie Faure writes, an atomic commit is “as small as possible, but complete”.
For each commit message, aim to answer the question: “What are you changing and why?” Include the JIRA ticket code(s) within your commit messages to provide context to the changes and for improved traceability.
Commit messages should be concise yet informative, providing enough detail to understand the changes made and their purpose. They should clearly state the issue they are addressing or the enhancement they are introducing.
Consider the following examples:
Helpful commit messages:
Section titled “Helpful commit messages:”Validate uniqueness of Service Category name. PA-2298Added Kai to our testimonials page. [PA-2289]Moved address related methods in Shipments into new module. KT-760 KT-644Added a global env for NIKE_NEWS_HOST so that we can pass that into some URL helpers that were defaulting to the hostname of admin/CMS for emails. Nike team would like to hide admin URLs from those they send pitch emails to. NK-2307
Not-so-helpful commit messages:
Section titled “Not-so-helpful commit messages:”edited spec fileupdated styling
These commit messages will be viewed in the git log by anyone who needs to understand the evolution of the project. Therefore, they should be clear enough to aid anyone trying to identify the specific commit that may have introduced an issue or a failing spec. The aim is to streamline debugging and promote clear understanding of each commit’s impact on the overall project.
Branch Naming
Section titled “Branch Naming”We use Jira issue types as prefixes in our branch naming practices to add context. After the prefix, we use our own initials along with the project shortname and issue number. After the identifying project info, we include a brief description of the work to be done on the branch. Here are some examples of our naming conventions, categorized by issue type:
Epic: For large features. Example:epic/rr-PROJ-123-adds-ecommerce-functionalityStory: Belongs to an Epic and may have sub-tasks. Example:story/rr-PROJ-124-implements-shopping-cart-featureSub-task: Parts of a story assigned to different developers. Example:subtask/rr-PROJ-125-implements-cart-UITask: For straightforward tasks handled by a single developer. Example:task/rr-PROJ-101-updates-checkout-buttonBugfix: For branches dealing with bug fixes. Example:bugfix/rr-PROJ-101-fixes-broken-nav-link
Why do we use the prefixes? When we’re looking at unclosed branches, we can get a sense of what type of work is being done on that branch. Likewise, when a PR comes our way, we can quickly and pretty accurately assume the type of work that we’re being asked to review. This helps us prioritize PR reviews if we’re short on time; for instance, if you only have 10 minutes to review a PR, a prefix might help you identify one that could be done quickly and urgently (a bugfix, for instance), versus one that is not so timely and will likely require a more thorough review (an epic or story, for instance).
Workflow
Section titled “Workflow”To maintain a clear and clean Git workflow, you should always perform all work in feature branches. Each feature branch should ideally represent a single piece of functionality or a bug fix. This isolates changes and makes it easier to manage updates or revisions to the codebase.
Managing Staging Branch
Section titled “Managing Staging Branch”The staging branch serves as a pre-production environment, allowing for testing and review of changes before they are merged into the main production branch.
After your work on a feature branch is complete and tested, merge your feature branch into the staging branch in preparation for deployment to the staging environment.
When releasing to the staging environment, tag the release using the following pattern:
git tag -a YYYY-MM-DD.# -m "merge JIRA-TICKET-CODE"
The date represents the day of the release, while the number following the date can be used for multiple releases within a single day. The JIRA ticket code is the identifier for the issue related to the release.
Remember, Git doesn’t push tags to the remote repository by default when you push a branch or commit. You need to explicitly push tags using the --tags flag:
git push origin staging --tags
Managing Main Branch
Section titled “Managing Main Branch”The main branch is typically the production environment. The code in the main branch should be stable, thoroughly tested, and ready for deployment at any time.
Once the changes in the staging environment have been tested and approved, merge the feature branch into the main branch for deployment to the production environment. Similar to the staging branch, any changes should be thoroughly tested in a feature branch before being merged into main/production.
Merging
Section titled “Merging”Merging is a fundamental practice in Git that integrates changes from different branches into a single branch. It plays a critical role in the workflow as it allows you to incorporate updates, new features, and fixes into your main codebase. Given its importance, understanding and correctly implementing merging strategies is essential.
When merging changes from a remote repository, allow branches to fast-forward. Fast-forwarding is a straightforward method of merging that simply updates your branch pointer to the latest commit if your branch has no new commits of its own. This method maintains a linear history, making it easier to follow.
The command for a fast-forward merge, when pulling from a remote branch, is as follows:
git pull origin branch-name
However, in situations where you want to retain context about the feature development or you need to preserve information about the branch being merged, you should prevent fast-forwarding. This is especially important when merging feature branches into the main or staging branches. To prevent fast-forward merges, use the --no-ff option with the git merge command. This option creates a new commit even if the merge could be performed with a fast-forward, thus preserving history about the source of the feature branch.
The command to merge without fast-forwarding is as follows:
git merge --no-ff branch-name
Staging Branch vs Production Branch
Section titled “Staging Branch vs Production Branch”The staging branch serves as a test bed for new changes, while the production branch (commonly referred to as the main branch) should contain stable, thoroughly tested code ready for production deployment.
Merging to the staging branch allows you to test your changes in a near-production environment without affecting the stability of the production branch. Once testing is complete and the changes have been approved, the changes can be merged into the production branch.
Always ensure that changes are thoroughly tested in the staging branch before merging into the production branch. This process mitigates the risk of introducing unstable code into your production environment.
Rebasing
Section titled “Rebasing”Rebasing is another way to integrate changes from one branch into another in Git. It offers a clean, linear project history by moving or combining commits. While powerful, rebasing needs to be used with care due to its potential to rewrite commit history. Here’s how you can effectively use rebasing in your workflow:
-
Avoid rebasing pushed branches: As a rule of thumb, never rebase a branch that has been pushed and shared with others. This is because rebasing can alter commit history, which could cause confusion or conflicts for other developers working on the branch. It’s safe to rebase local, unpushed commits since these changes are not yet shared with the team.
-
Avoid rebasing when conflicts would occur: If rebasing would lead to complex conflicts or disrupt the workflow of your team, opt for merging instead. In such a situation, perform a merge without allowing a fast-forward using
git merge --no-ff. This practice will maintain the context of your branch history by creating a new merge commit. -
Rebase the main branch onto feature branches: To keep your feature branches up-to-date with the latest changes in the main branch, you can regularly rebase the main branch onto your feature branch. This practice allows your feature branch to get the latest updates from the main branch while keeping its history clean.
-
Interactive rebasing: Use
git rebase -ito modify history in a more granular way. This powerful command allows you to squash commits, alter commit messages, and re-order commits. However, it should be used responsibly and mainly for cleaning up local, unshared commits before pushing to a remote repository. -
Don’t change shared history with interactive rebase: While interactive rebase is a powerful tool, it should never be used to alter commits that have already been shared with others. Doing so can lead to confusion and conflicts within the team.
Remember, the goal of rebasing should always be to make your project history cleaner and more understandable. Always use it responsibly, respecting the shared history of your team.
Rollbacks
Section titled “Rollbacks”There may be occasions where it becomes necessary to roll back to a previous state of your code. This could be due to a critical issue discovered in production, a failed feature implementation, or simply the need to restore a previous state for comparison or re-evaluation. Git provides several mechanisms for performing rollbacks, allowing you to effectively handle such situations:
-
Using
git revert:This command creates a new commit that undoes the changes made in a specific commit. This is the safest and most common method for undoing changes, as it doesn’t alter existing history. If you’re working in a shared repository,
git revertis often the best choice because it avoids the potential confusion and conflicts caused by changing existing commit history.For example, to revert the last commit, you would use
git revert HEAD. -
Using
git reset:This command allows you to move the HEAD pointer back to a previous commit, essentially “forgetting” any commits that happened afterwards. However, it’s important to note that
git resetcan be dangerous if misused. The command can be used in three modes:--soft,--mixed, and--hard.git reset --soft <commit>will move HEAD to a previous commit, but it leaves your staged changes and working directory as they were.git reset --mixed <commit>(the default mode) will move HEAD and also unstage changes, but still leaves your working directory as it was.git reset --hard <commit>will discard all history and changes back to the specified commit. Be extremely careful with this mode as it permanently discards changes.
-
Using
git checkout:If you want to temporarily go back to the state of a specific commit without modifying the project history, you can use
git checkout <commit>. This will leave your repository in a detached HEAD state, meaning you’re not on any branch. This can be useful for examining or testing, but you shouldn’t make any changes in this state. If you do want to make changes, you should create a new branch while in this state.
Always remember to be cautious when performing rollbacks, especially when working with shared repositories. Rollbacks have the potential to modify the commit history, which can cause confusion or conflicts among team members if not done carefully.
Stashing
Section titled “Stashing”Git’s stash command provides a powerful tool to temporarily save changes that you’re not ready to commit yet, allowing you to switch contexts without committing half-done work or cluttering up your commit history.
You may find yourself in a situation where you’re working on a feature or bugfix and suddenly need to switch to a different task without committing your current changes. This is where git stash comes in. It takes your modified tracked files, stages changes, and saves them on a stack of unfinished changes that you can reapply at any time.
Our best practices for stashing within the team are:
-
Keep Minimal Active Stashes:
While
git stashallows you to create multiple stashes, we recommend keeping minimal active stashes – ideally only one, but no more than three. This is to keep your work environment clean and focused, minimizing the chances of confusion and forgotten changes. -
Name Your Stashes:
By default, Git doesn’t require you to name your stashes, but it’s a good practice to do so. Naming your stashes can help you understand the purpose of each stash when you look at a list of them later. Use the
git stash save "my stash name"command to name your stashes. Replace “my stash name” with a descriptive name that gives a clear indication of what changes the stash contains. -
Prune Stashes Frequently:
As with any other type of temporary storage, your stash stack can get cluttered over time. It’s a good idea to regularly go through your stashes and remove those that are no longer needed using the
git stash dropcommand followed by the stash name or stash@{index}. Pruning stashes regularly keeps your stash list manageable and prevents it from becoming a graveyard of forgotten changes.
Remember, stashing is a powerful tool, but it’s meant for temporary, short-term storage of changes. If you find yourself constantly relying on stashes, it might be a sign that you need to revisit your branching strategy or your work-in-progress limit.
Branch Pruning
Section titled “Branch Pruning”Keeping our git repositories clean and manageable is essential for effective collaboration and productivity. This includes regularly cleaning up branches that are no longer needed, such as those that have been merged or abandoned. Over time, we may accumulate an extensive collection of such branches which can create noise, making it difficult to distinguish between work-in-progress and outdated work.
Often, we find ourselves hesitant to delete these branches due to fear of losing unfinished work or work that was put on hold. Although this concern is valid, keeping a repository tidy is equally important. Therefore, we recommend a periodic cleanup of branches, particularly when they are still fresh in our memory.
Let’s dive into the process:
-
Refresh Local Git Cache from the Origin Git Repository:
Keep your local git cache updated to avoid confusion with stale data. Use
git fetch origin --pruneto sync with the remote repository and prune tracking branches no longer present on the remote. To check how many remote branches your project has, usegit branch --remotes | wc -l. -
Checkout & Update the Primary Branch:
Make sure you’re on the main branch and it’s up-to-date. Execute
git checkout mainfollowed bygit pull origin main. -
List Merged Branches:
Using
git branch --remotes --merged main, you can list all the remote branches that have been merged into the main branch. Be careful not to accidentally delete important branches used for deployments or the main branch itself. -
Filter the Branch List:
Using
awk, filter out essential branches like main, production, and staging that should not be deleted. Use the commandgit branch --remotes --merged main | awk '!/main|production|staging/'for this purpose. This command is non-destructive and can be used for spot checks. -
Delete Merged Branches:
After careful inspection and cross-checking with Github/Bitbucket, it’s time to delete the branches. You can do this manually using the
git push origin --delete branch-namecommand for each branch or use the following one-liner to delete all of them at once:Terminal window git branch --remotes --merged main | awk '!/main|production|staging/' | sed 's/origin\///' | xargs -n 1 git push origin --deleteRemember, this command is destructive! Make sure you’re confident that the branches being listed are no longer needed. Also, ensure that you have the
--mergedflag included and you’ve correctly filtered the branches.
Once this step is done, your repository should be much tidier. You can now review the remaining unmerged branches and decide which ones are worth keeping. While we can’t automate this decision-making process, your contribution to maintaining a clean, manageable repository is greatly appreciated.
Resources
Section titled “Resources”There are numerous resources available to learn more about Git best practices. Here are a few we recommend:
Git Commands Cheat Sheet
Section titled “Git Commands Cheat Sheet”Here are some commonly used Git commands and their explanations, which can serve as a quick reference guide:
Creating Repo
Section titled “Creating Repo”
git init: This command is used to initialize a new Git repository.git clone <url>: This command copies an existing Git repository from the specified URL.git clone <url> <local_repo_name>: This command clones an existing Git repository and names it locally as specified.Staging / Committing
Section titled “Staging / Committing”
git add -p(add patch): This command allows you to interactively stage parts of changes made to your tracked files.git add -i(interactive command line tool): This command is an interactive shell for staging changes for commit.git rm <filename>: This command deletes a file and stages the removal for commit.git mv <old_filename> <new_filename>: This command renames or moves files, and automatically stages the changes for a commit.git commit: This command records changes to the repository.git commit -m "descriptive message with ticket number": This command records changes to the repository with a specific commit message.git commit --amend: This command alters the most recent commit.git checkout <filename>: This command discards all changes made to the named file since the last commit.git reset <filename>: This command unstages staged changes of the named file but keeps the changes in the file.Branching
Section titled “Branching”
git checkout <branch_name>: This command switches to the specified branch.git checkout -b <branch_name>: This command creates a new branch and switches to it immediately.git branch -d <branch_name>: This command deletes a merged branch.git branch -D <branch_name>: This command forcefully deletes an unmerged branch. Use this with caution!git branch: This command lists all local branches.git branch -a: This command lists all branches, including local and remote.git branch -v: This command shows the last commit on each branch.git branch -vv: This command shows the last commit and tracks the branch for each local branch.Remotes
Section titled “Remotes”
git remote -v: This command lists all remote repositories.git remote add <remote_name> <remote_url>: This command adds a remote repository with the specified name and URL.git pull: This command fetches from and integrates with another repository or a local branch.git pull <remote_name> <branch_name>: This command fetches from a specific branch of a specific remote repository and merges it.git pull --rebase: This command fetches the branch and then rebases it.git push: This command updates remote references along with associated objects.git push <remote_name> <branch_name>: This command pushes the branch to the specified remote repository.Merging / Rebasing
Section titled “Merging / Rebasing”
git merge <branch_from> <branch_to>: This command merges the specified branches.git merge --no-ff <branch_from> <branch_to>: This command merges only if the branches can be fast-forwarded.git rebase <branch_from> <branch_to>: This command applies changes from one branch onto another.git rebase --abort: This command stops the current rebase process.git rebase --continue: This command continues the rebase process after resolving conflicts.git rebase -i(interactive mode): This command provides an interface to alter commits during the rebase process.Tagging
Section titled “Tagging”
git tag <tag_value>: This command creates a tag for easy reference to a certain point in the history.Stashing
Section titled “Stashing”
git stash: This command temporarily saves changes that you don’t want to commit immediately.git stash apply: This command re-applies previously stashed changes.git stash pop: This command applies stashed changes and then drops them from your stack.git stash drop: This command discards the most recently stashed changeset.git stash list: This command lists all stashed changesets.git stash show: This command shows the summary of a stash.git stash show -p: This command shows the full diff of a stash.Visibility
Section titled “Visibility”
git status: This command displays the state of the working directory and the staging area.git diff: This command shows differences between tracked files.git diff <SHA1> <SHA2>: This command shows differences between two snapshots of the tracked files.git log: This command shows commit history in reverse chronological order.git log -p <filename>: This command shows the history of the specified file.git log --follow <filename>: This command shows the history for the specified file including any path changes.git blame <filename>: This command shows what revision and author last modified each line of a file.Useful Miscellany
Section titled “Useful Miscellany”
HEAD: This represents the current commit.tilde:
HEAD~orHEAD~1: This points to the immediate parent of the current snapshot.HEAD~0: This points to the current snapshot.HEAD~n: This points to the nth parent of the current snapshot.caret:
HEAD^orHEAD^1: This points to the first parent of the current snapshot. It’s functionally equivalent toHEAD~.HEAD^0: This points to the current snapshot.HEAD^2: This points to the second parent in the case of a merge, if one exists.